I recently wrote this article Integrate custom tools into an AI Agent which illustrates how to configure tools and an AI Agent to call those tools. In that article there was no Model Context Protocol (MCP) capability utilized. MCP provides the following benefits when compared to integrating custom tools directly from code.
- Dynamic tool discovery which enables an AI Agent to discovery a list of tools dynamically, improving adaptability and reduces maintenance.
- Interoperability across LLMs occurs when the model is not statically bound to any tool or MCP server. Instead, the model can be loaded at runtime and easily changed to evaluate inference across different models for performance and output comparison.
- Standard security eliminates the need multiple authentication protocols or the management of separate keys per MCP server.
To learn about integrating MCP tools with an AI Agent using a Remote MCP server read this article: Integrate MCP Tools with AI Agents – Remote MCP server
To integrate MCP tools with an AI Agent continue reading through these steps.
- Create a local MCP server
- Code the MCP tools with @mcp.tool() decorator
- Create MCP client and start the MCP server
- Create the MCP client session
- Create the FunctionTool definitions
- Create the AI Agent
- Infer the AI Agent for tools discovery
- Infer the AI Agent for NLP output
In this and other articles the Azure AI Projects client library for Python is utilized. All references made towards “How to” are in that context unless otherwise stated.
Create a local MCP server
This is a great approach for testing and even running smaller AI Agent solutions which use an MCP server. This approach is a bit similar to the AI Integration with custom tools but instead of having your tools in a .py file in the same solution as the AI Agent, instead they are hosted on a server. This would be a better design from the beginning of a project so that the migration of the local MCP server tools can be easily transfered to a larger server. The AI Agent could then be reconfigured to use the MCPTool pointing to an HTTPS endpoint which could scale to support more consumption and be more resilient.
A common tool for running an MCAP server on a local machine is FastMCP. I equate running a local MCP server like this to running IIS locally and accessing it with localhost. To configure an MCP server to run locally, consider adding the following code into a Python file named server.py.
from fastmcp import FastMCP
mcp = FastMCP(name="TokenManager")
Listing 1: local MCP server, configure FastMCP
You do first need to install the FastMCP libraries and then give the MCP server a label, in this case “TokenManager” which help make sure you are not consuming too many tokens, or utilizing an optimal amount for the given context.
Code the MCP tools with @mcp.tool() decorator
In the same server.py file you will add the functions aka tools which the MCP server provides. The trick here is to add the @mcp.tool() decorator before the function declaration so the runtime registers this is a tool. This allows the LLM to discover the function. Here is an example of a Token Manager function, can be expanded to make REST API to Azure and retrieve actual details.
def get_token_usage(self) -> dict:
  """Returns current token usage statistics."""
  return {
    "prompt_tokens": 15243,
    "completion_tokens": 8172,
    "total_tokens": 23415,
    "remaining_quota": 76585
  }
Listing 2: local MCP server, register an MCP tool
Add the end of server.py add the code to start the MCP server.
mcp.run(show_banner=False)
Listing 3: local MCP server, the local MCP server
Create MCP client and start the MCP server
Add the following code into a file named client.py, not a required name just a suggestion. As this is an MCP client it will contain the logic necessary to start the MCP server, call the functions that instantiate the AI Agent, load the tools and call the LLM endpoints. This necessitates the need to utilize main() which is an entry point for the compiler to begin the series of code execution.
async def main():
  import sys
  exit_stack = AsyncExitStack()
  try:
    session = await connect_to_server(exit_stack)
    await chat_loop(session)
  finally:
    await exit_stack.aclose()
Listing 4: local MCP server, run the local MCP server
Also notice that is it important to shutdown the MCP server after it is no longer needed. The MCP server is started by executing these lines of code.
stdio_transport = await exit_stack
      .enter_async_context(stdio_client(server_params))
    stdio, write = stdio_transport
Listing 5: local MCP server, start the local MCP server
Create the MCP client session
The creation of a client session is an important one in this context as this is where the list of tools are loaded into when the MCP server is started.
session = await exit_stack
      .enter_async_context(ClientSession(stdio, write))
await session.initialize()

response = await session.list_tools()
tools = response.tools
Listing 6: local MCP server, start the local MCP client and load MCP server tools
Create the FunctionTool definitions
As you may recall from the Integrate custom tools into an AI Agent post the FunctionTools class was used to load the tools into a list which is sent to an LLM endpoint to determine which toll should be used for inferring the user prompt. In this case, instead of adding the one-by-one, the code can loop through all the tools loaded into the MCP client which were loaded at runtime. Here is a snippet of code that illustrates just that.
mcp_function_tools: FunctionTool = []
  for tool in tools:
    function_tool = FunctionTool(
      name=tool.name,
      description=tool.description,
      parameters={
        "type": "object",
        "properties": {},
        "additionalProperties": False,
      },
      strict=True
    )
mcp_function_tools.append(function_tool)
Listing 6: local MCP server, load the MCP tools for reference
Create the AI Agent
Creating an AI Agent utilizes the azure.ai.projects.AIProjectClient class using the agents.create_version() method. This is where the preliminary instructions are sent to the LLM, I refer to this as the system prompt. Here is a brief snippet of that.
agent = project_client.agents.create_version(
  agent_name="token-mamaner-agent",
  definition=PromptAgentDefinition(
  model=model_deployment,
  instructions="""
  You are an LLM token manager assistant. Here are some general guidelines:
  - Recommend increasing remaining_quota if total_tokens > remaining_quota
  - Recommend optimizing completion_tokens if total_tokens > 20000
  """,
  tools=mcp_function_tools
  ),
)
Listing 7: local MCP server, create the Agent
Infer the AI Agent for tools discovery
Now send the first request to the LLM endpoint which will utilize the system prompt and tools list. Same as seen in Listing 3 and Listing 4 in my previously written article here: Integrate custom tools into an AI Agent
Infer the AI Agent for NLP output
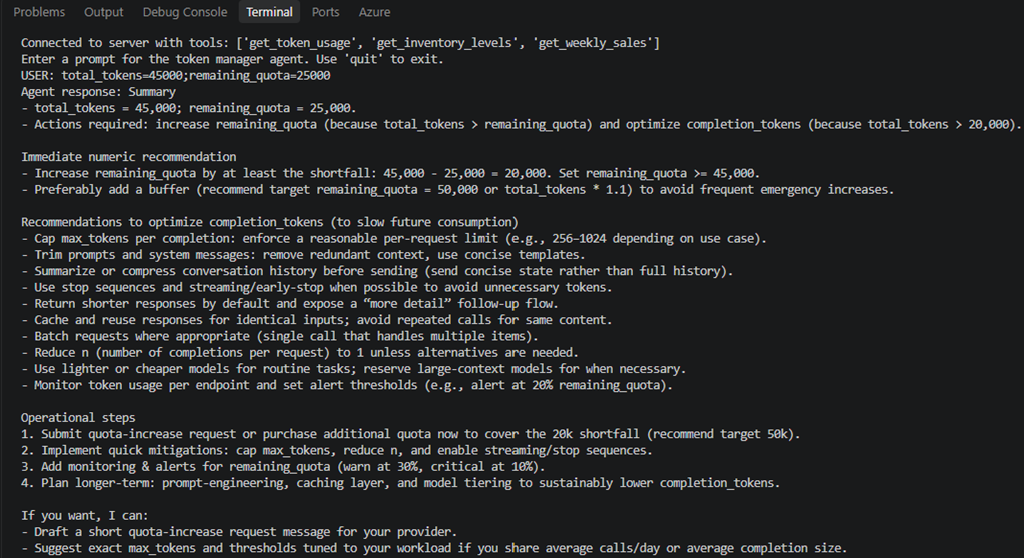
And finally, combine the tools together with the user input aka user prompt to receive an NLP response. Let’s assume there is an autonomous AI Agent whose responsibility is to monitor the usage of LLM consumption and captures total_tokens and remaining_quota, then send it to this AI Agent for guidance. The AI Agent receives the following as user input.
total_tokens=45000;remaining_quota=25000
That input along with the MCP tools is sent a second time to the LLM endpoint for inference. Here is a short textual summary of the output.
Agent response: Summary
- total_tokens = 45,000; remaining_quota = 25,000.
- Actions required: increase remaining_quota
  (because total_tokens > remaining_quota) and
  optimize completion_tokens (because total_tokens > 20,000).
Here is an image with the entire response.