You may have noticed that in my previous articles I used Azure AI Projects client library for Python – version 2.5.0 library. Those articles illustrate how to build AI Agents, MCP Tools, and infer instructions using an LLM.
- Integrate custom tools into an AI Agent
- Integrate MCP Tools with AI Agents – Remote MCP server
- Integrate MCP Tools with AI Agents – Local MCP server
That library works fine, but after additional learnings I have discovered a much more exciting and Azure friendly library which is the Microsoft Agent Framework. “The Microsoft Agent Framework is the next generation of both Semantic Kernel and AutoGen, built by the same teams. It combines AutoGen’s straightforward agent abstractions with Semantic Kernel’s enterprise features—session-based state management, type safety, middleware, and telemetry—and adds graph-based workflows for explicit multi-agent orchestration. The result is a flexible, production-ready SDK for building single-agent and multi-agent solutions.”
You will see may similarities using the Microsoft Agent Framework as you did with the library from those previous articles. To import the Microsoft Agent Framework you need to install the agent-framework-core and the agent-framework-foundry projects into your environment and import them like the following.
from agent_framework import tool, Agent
from agent_framework.foundry import FoundryChatClient
Listing 1, importing the Microsoft Agent Framework
To create a tool you use the @tool decorator like shown here. Notice that there is a approval_mode which support the Human In The Loop (HITL) capability. Also notice that the function has clear descriptions of each parameter needed for the functional to execute. Descriptions are what the LLM uses to determine which tools to use, so make them desrciptive.
@tool(approval_mode="never_require")
def submit_claim(
    to: Annotated[str, Field(description="Who to send the email to")],
    subject: Annotated[str, Field(description="The subject of the email.")],
    body: Annotated[str, Field(description="The text body of the email.")]):
        print("\nTo:", to)
        print("Subject:", subject)
        print(body, "\n")
Listing 2, declaring and defining an AI Agent tool
Next you would create the chat client as shown here. The client needs the Microsoft Foundry endpoint which exposes the deployed AI model, in this case gpt-5-mini. An interesting point here is the usage of the AzureCliCredential instead of DefaultAzureCredential. Both will work and for a local development, proof of concept (POC) activity it is fine to use AzureCliCredential. However, if the code is deployed to Azure, AzureCliCredential will not function, so consider using DefaultAzureCredential because when deployed to Azure it will ultimately use managed identity to access resources, this is referred to as a credential chain. Where DefaultAzureCredential uses your identity while coding locally, then will attempt other authentication methods when running from other environments.
client = FoundryChatClient(
        project_endpoint=os.getenv("PROJECT_ENDPOINT"),
        model=os.getenv("MODEL_DEPLOYMENT_NAME"),
        credential=AzureCliCredential()
    )
Listing 3, building the chat client
Initializing the AI Agent is as shown here as agent. It utilizes the client created previously, the system prompt, and the tool to use when the AI Agent is invoked.
async with (
    Agent(
        client=client,
        name="ExpenseClaimAgent",
        instructions="""You are an AI assistant for expense claim submission.....""",
        tools=[submit_claim],
    ) as agent,
):
Listing 4, initializing the AI Agent
To then call the AI Agent and execute the instructions and prompt use this code.
try:
    prompt_messages = [f"{prompt}: {'09-SEP-2026,taxi,24.00'}"]
    response = await agent.run(prompt_messages)
    print(f"\n# Agent:\n{response}")
except Exception as e:
    print (e)
Listing 5, use the agent
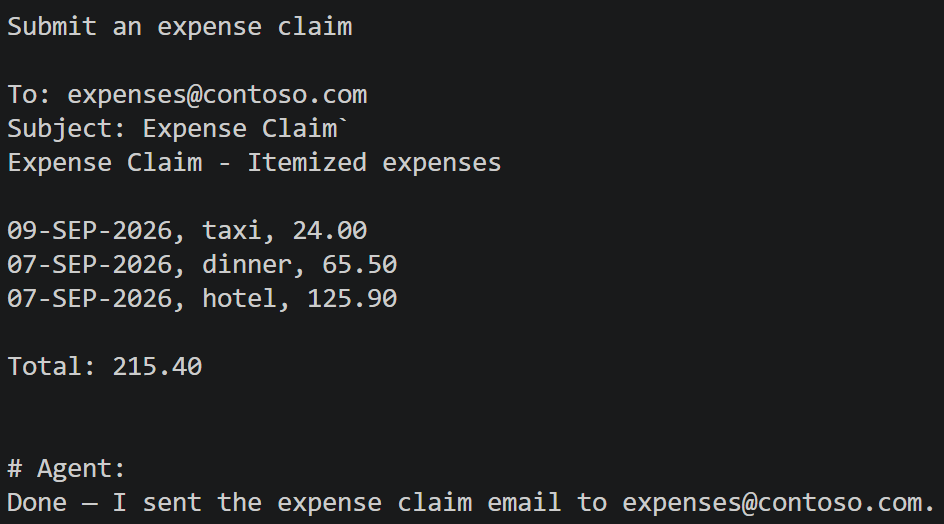
It is always good practice to place you code within try…catch blocks so that value error messages can be rendered. The messages are very useful when troubleshooting. Finally, when the expense claim is submitted you will experience the following.