With each version of Microsoft Windows Server comes a new version of Internet Information Services (IIS). With the recent release of Windows Server 2016 comes IIS version 10. Before I cover these new features, here are a few articles which I have already written which you may be interested in:
- What’s new in IIS 8.5
- Using HTTP/2 with ARR and IIS 10
- Change or modify a Response Header value using URL Rewrite
- IIS Debugging Labs – Information and setup instructions
- Secure channel compatibility support with SSL and TLS
- Using TLS 1.2 with WCF
- Configure an IIS Server Core server for remote management
- How to add a Server Core IIS server to a domain
- Install Failed Request Tracing on IIS 8.5 Server Core
- Tuning IIS 10
Here is a list of new IIS 10 features:
- HTTP/2
- Wildcard host headers
- Environment variables for application pools
- HTTP status code 308 for permanent redirects
- Server header removal
- Failed request tracing – traceAllAfterTimeout
- Log event on recycle defaults
- New IIS administration PowerShell cmdlets
- CNG Provider for configuration value encryption
- IIS on Nano server
- IIS on containers
- IIS 10 version 1709 (*), HSTS, Containerization, IISAdministration cmdlets, Logging Enhancements (Cryptographic Protocol)
Continue reading for more details on the above noted new IIS 10 features.
HTTP/2
When IIS 10 was first released I wanted to check an see if HTTP/2 worked with ARR, I wrote a post about that experience here. This is also a very helpful article in regards to HTTP/2 on IIS.
Some items to watch out for in regards to HTTP/2:
- You cannot use Windows Authentication with HTTP/2. If you do enable IWA, then IIS will fall back to HTTP/1.1.
- You must communicate using HTTPS, HTTP/2 over TLS is a requirement.
- Both the client and the server must support TLS
- Bandwidth throttling is not enforced in HTTP/2 and it will be ignored.
Some good items to know about HTTP/2:
- HTTP/2 reuses connections to service multiple requests. This is in contrast to needing to setup/creating the TCP connection and the TLS handshake for each connection.
- Using HPACK you can compress the the text within the HEADER.
- The IIS server can respond to requests a client hasn’t yet made by ‘pushing’ the additional resources as part of the first request.
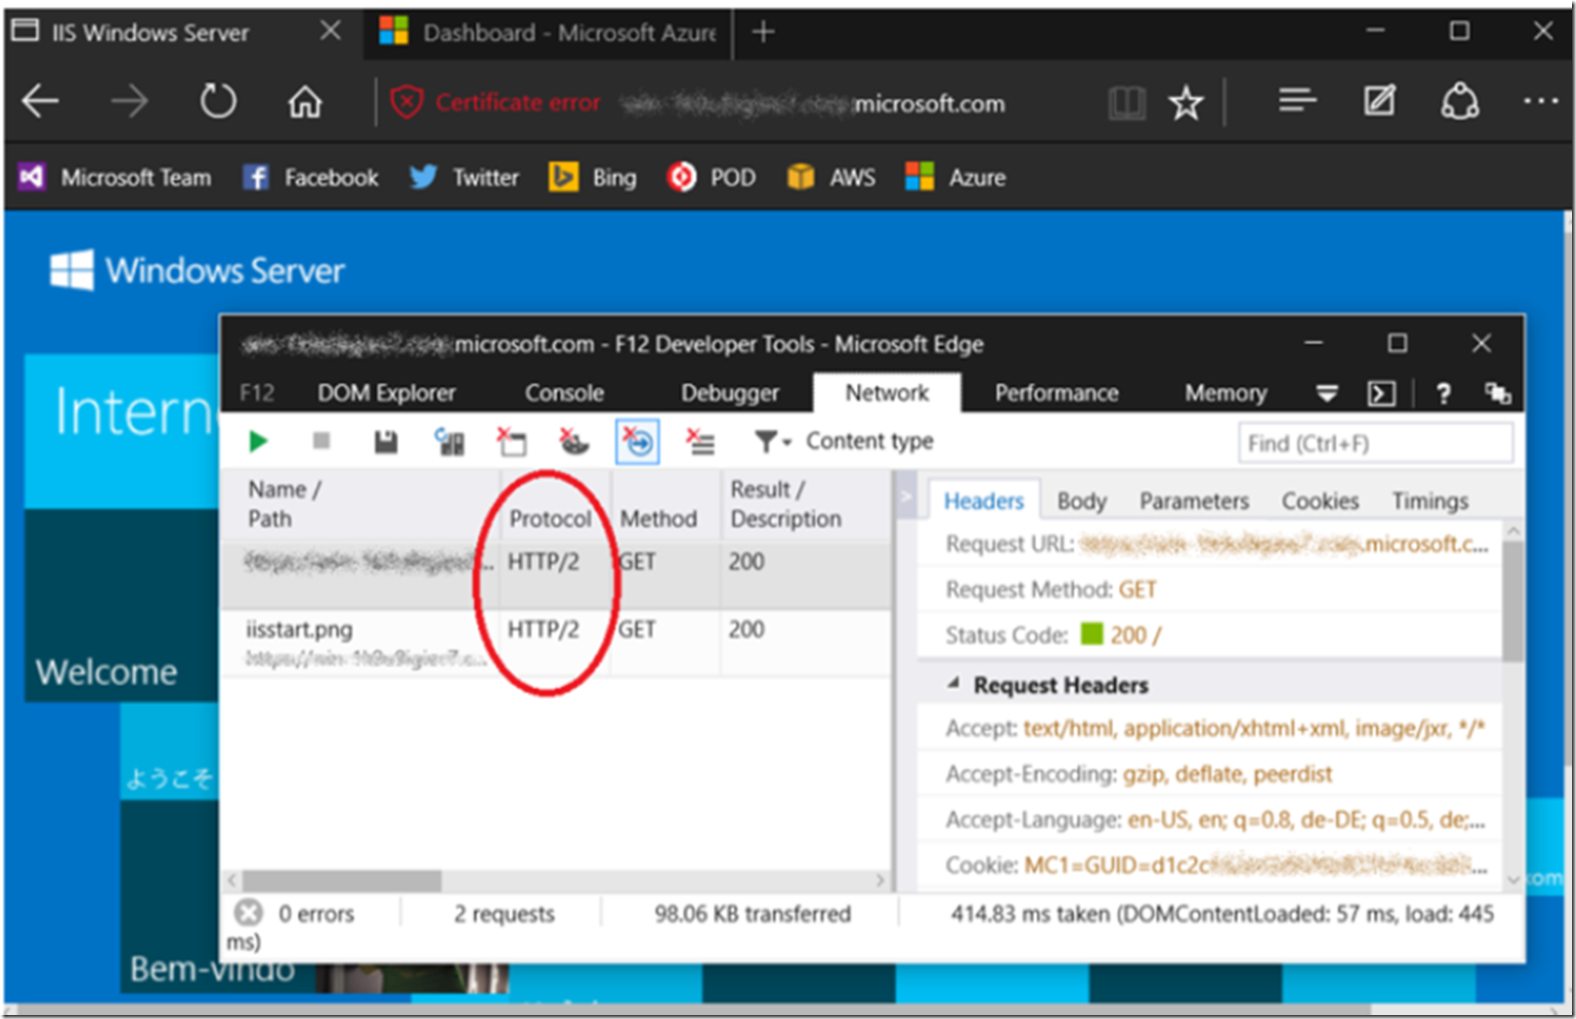
This is often referred to as ‘inlining’. Using PushPromise API in ASP.NET or the HttpDeclarePush API for native. Using the F12 Developer tools in the Microsoft Edge browser, you can capture a network trace and confirm that you are indeed using HTTP/2, as shown in Figure 1.
Figure 1, How to confirm you are using HTTP/2 with IIS
Wildcard host headers
Before IIS 10 it was possible only to enter a full host name into the binding configuration. If you tried to enter a wildcard host name into the binding in IIS 8.5, you would get an error, see Figure 2. Find some more information about this feature here.
Figure 2, wildcard host headers in IIS 10
“The specified host name is incorrect. The host name must use a valid host name format and cannot contain the following characters:”
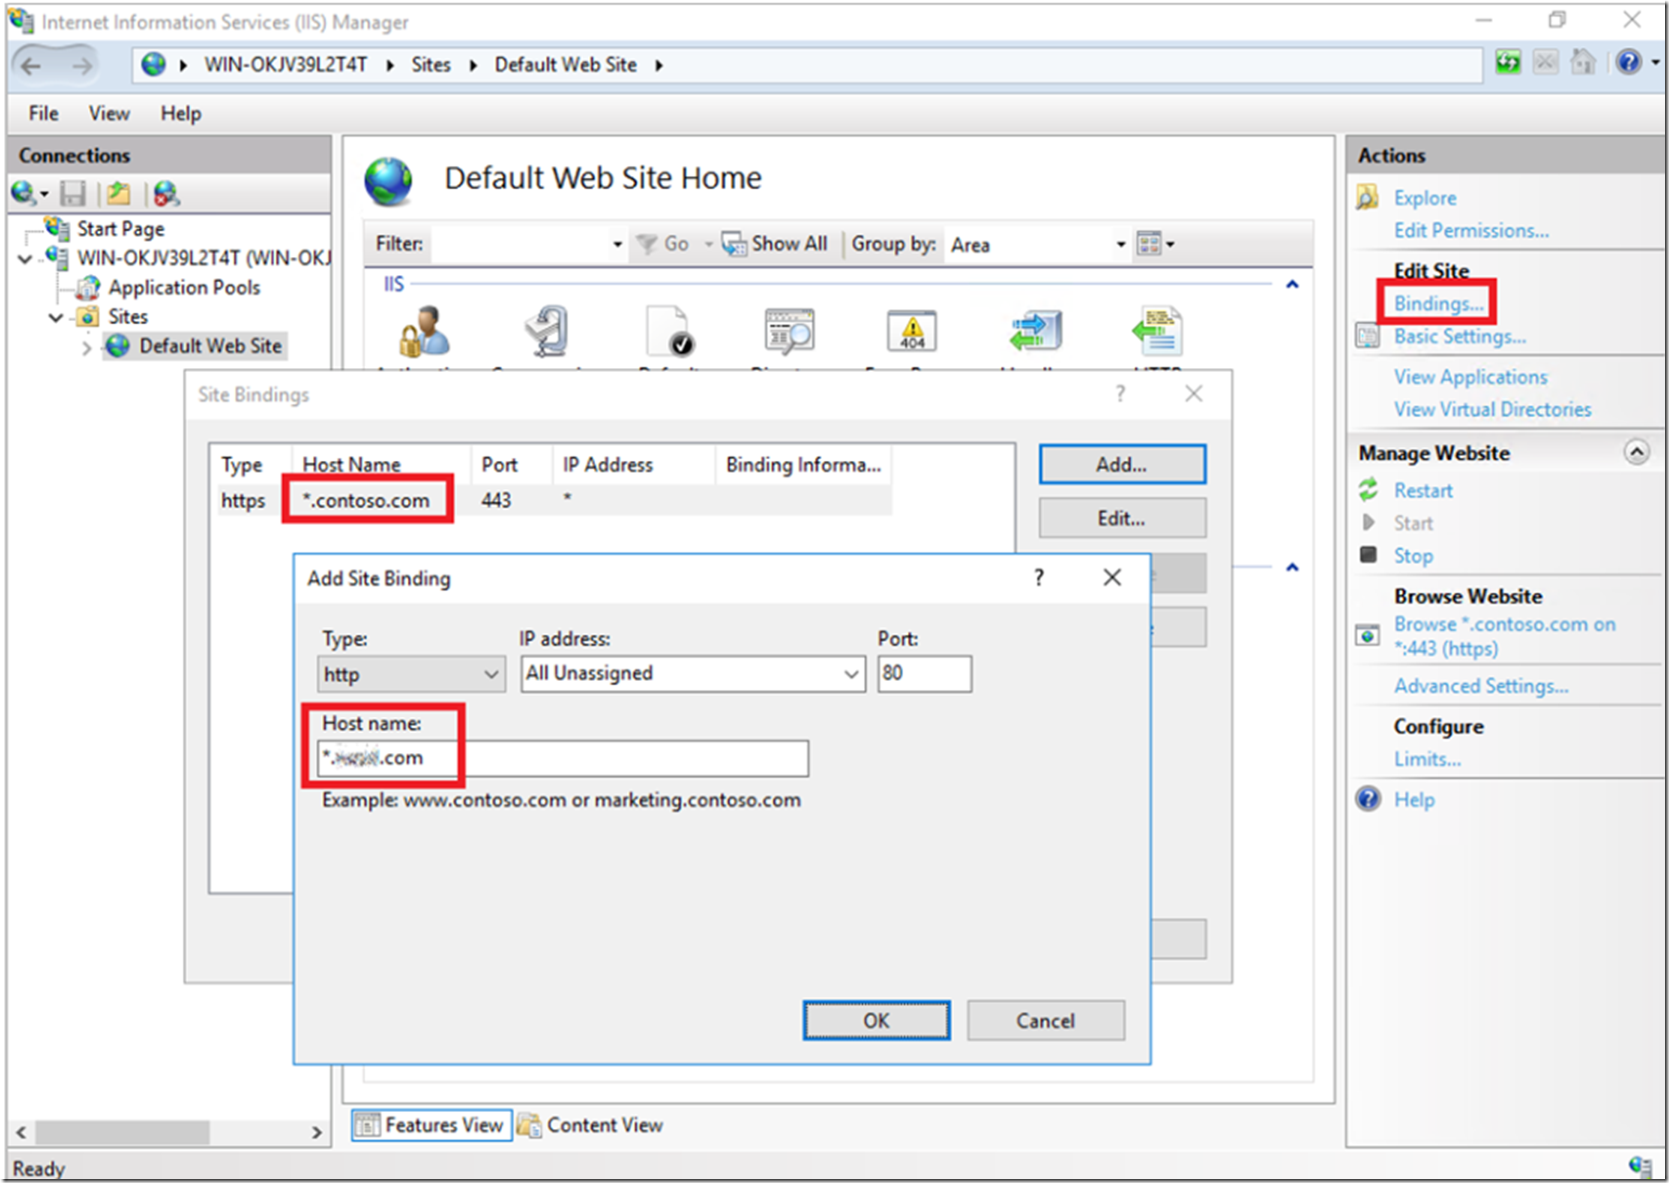
By adding a wildcard host name in IIS 10 as shown in Figure 3, you do not need to create a sub domain binding for each sub domain, instead you can have a single binding for all the subdomains on the web server. One binding for all subdomains will then route to the same site. In your coding you can manage any rendering differences or actions based on the URL used to access you site.
Figure 3, wildcard host headers in IIS 10, host name
Adding a host name with a value *.contoso.com will manage requests to private.contoso.com, blog.contoso.com, admin.contoso.com and any other supported word. Note however, that you cannot bind deeper level sub domains like admin.private.contoso.com with a pattern of ..contoso.com. However, give *.private.contoso.com a try.
You can also perform the binding using the IIS PowerShell cmdlet New-WebBinding as shown here.
New-WebBinding -Name "Default Web Site" -IPAddress "*" -Port 80 -HostHeader "*.contoso.com"
This is a useful addition to the IIS features, it makes things more manageable, IMO.
Environment variables for application pools I cannot begin to tell you how many times I have been called into a customer critical downtime case where the issue was that a 32bit IIS process was trying to load 64bit 3rd party client code or the 64bit IIS process was trying to load the 32bit client utility. To get most of those situations under control was to change the bit-ness of the IIS process or to install the correct version of the client utility so it loaded successfully into the IIS process. Therefore you can use this feature to identify where the correct binaries are stored stored based on the application pool and reference then when the IIS process starts for example:
appcmd set apppool "my32BitPool" /+environmentVariables.add[@start,name='PATH32',value='C:\Program Files (x86)\binaries']

appcmd set apppool "my64BitPool" /+environmentVariables.add[@start,name='PATH64',value='C:\Program Files\binaries']

Add-WebConfigurationProperty -value @{name='PATH32';value='C:\Program Files (x86)\binaries'} -filter "system.applicationHost/applicationPools/add[@name='my32BitPool']/environmentVariables" -pspath 'MACHINE/WEBROOT/APPHOST' -name "."

Add-WebConfigurationProperty -value @{name='PATH64';value='C:\Program Files\binaries'} -filter "system.applicationHost/applicationPools/add[@name='my64BitPool']/environmentVariables" -pspath 'MACHINE/WEBROOT/APPHOST' -name "."
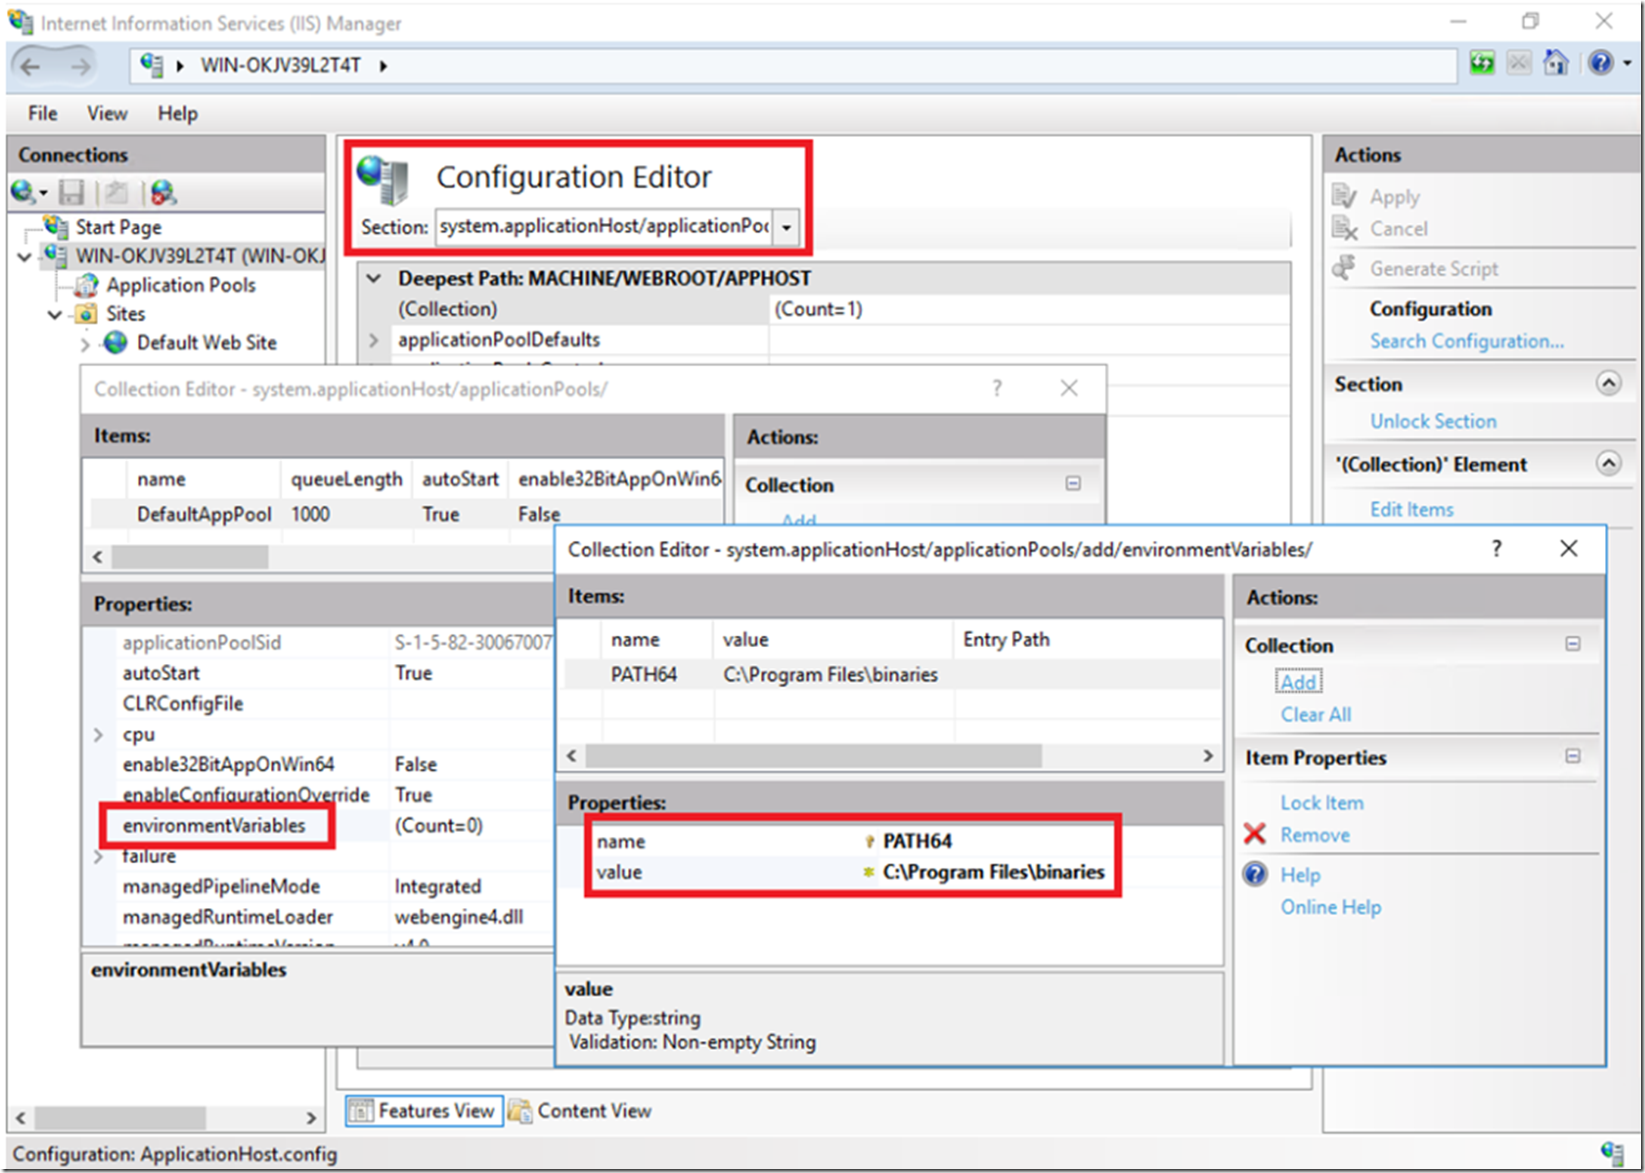
In addition to the AppCmd syntax and PowerShell cmdlets, you can also make the configuration using Configuration Manager, as shown in Figure 4.
Figure 4, environment variables in IIS 10
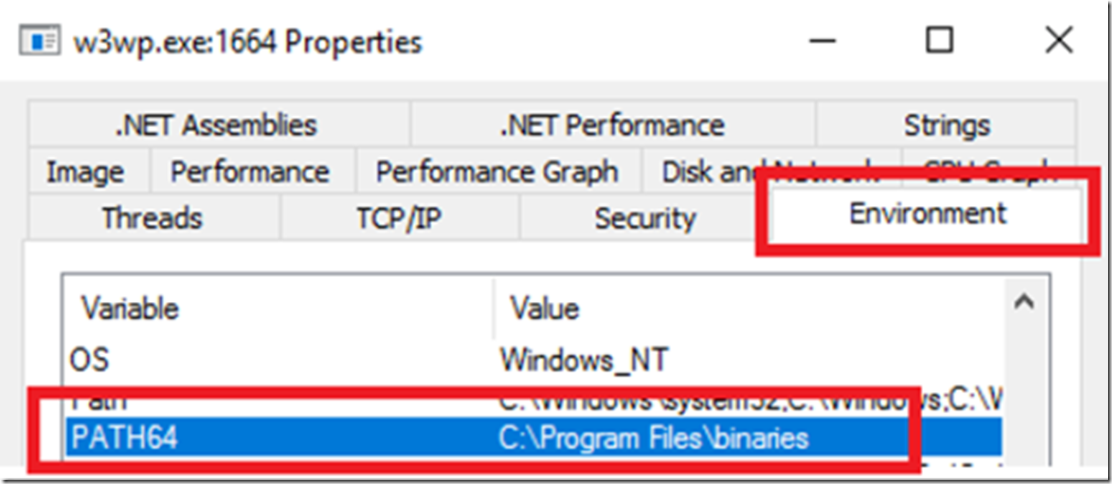
As seen in Figure 5, when the IIS process is running and you look at the Environment variables using Process Explorer, you can see the variable and the value.
Figure 5, environment variables in IIS 10
I also wrote an article here where I discuss the use of MKLINK (I would think SYMLINK would apply here as well). If your application uses or requires either of those configurations, consider using this Environment Variable features instead.
Then you can access the variable using the following line of code:
var path = Environment.GetEnvironmentVariable("PATH64");
The environmentVariables element allows you to set an environment variable for a specific IIS process. The name / value pair is specific to and accessible only from the current process. Read more about this here and here. How to set environment variables for a process, how to set environment variables for an IIS process.
HTTP status code 308 for permanent redirects
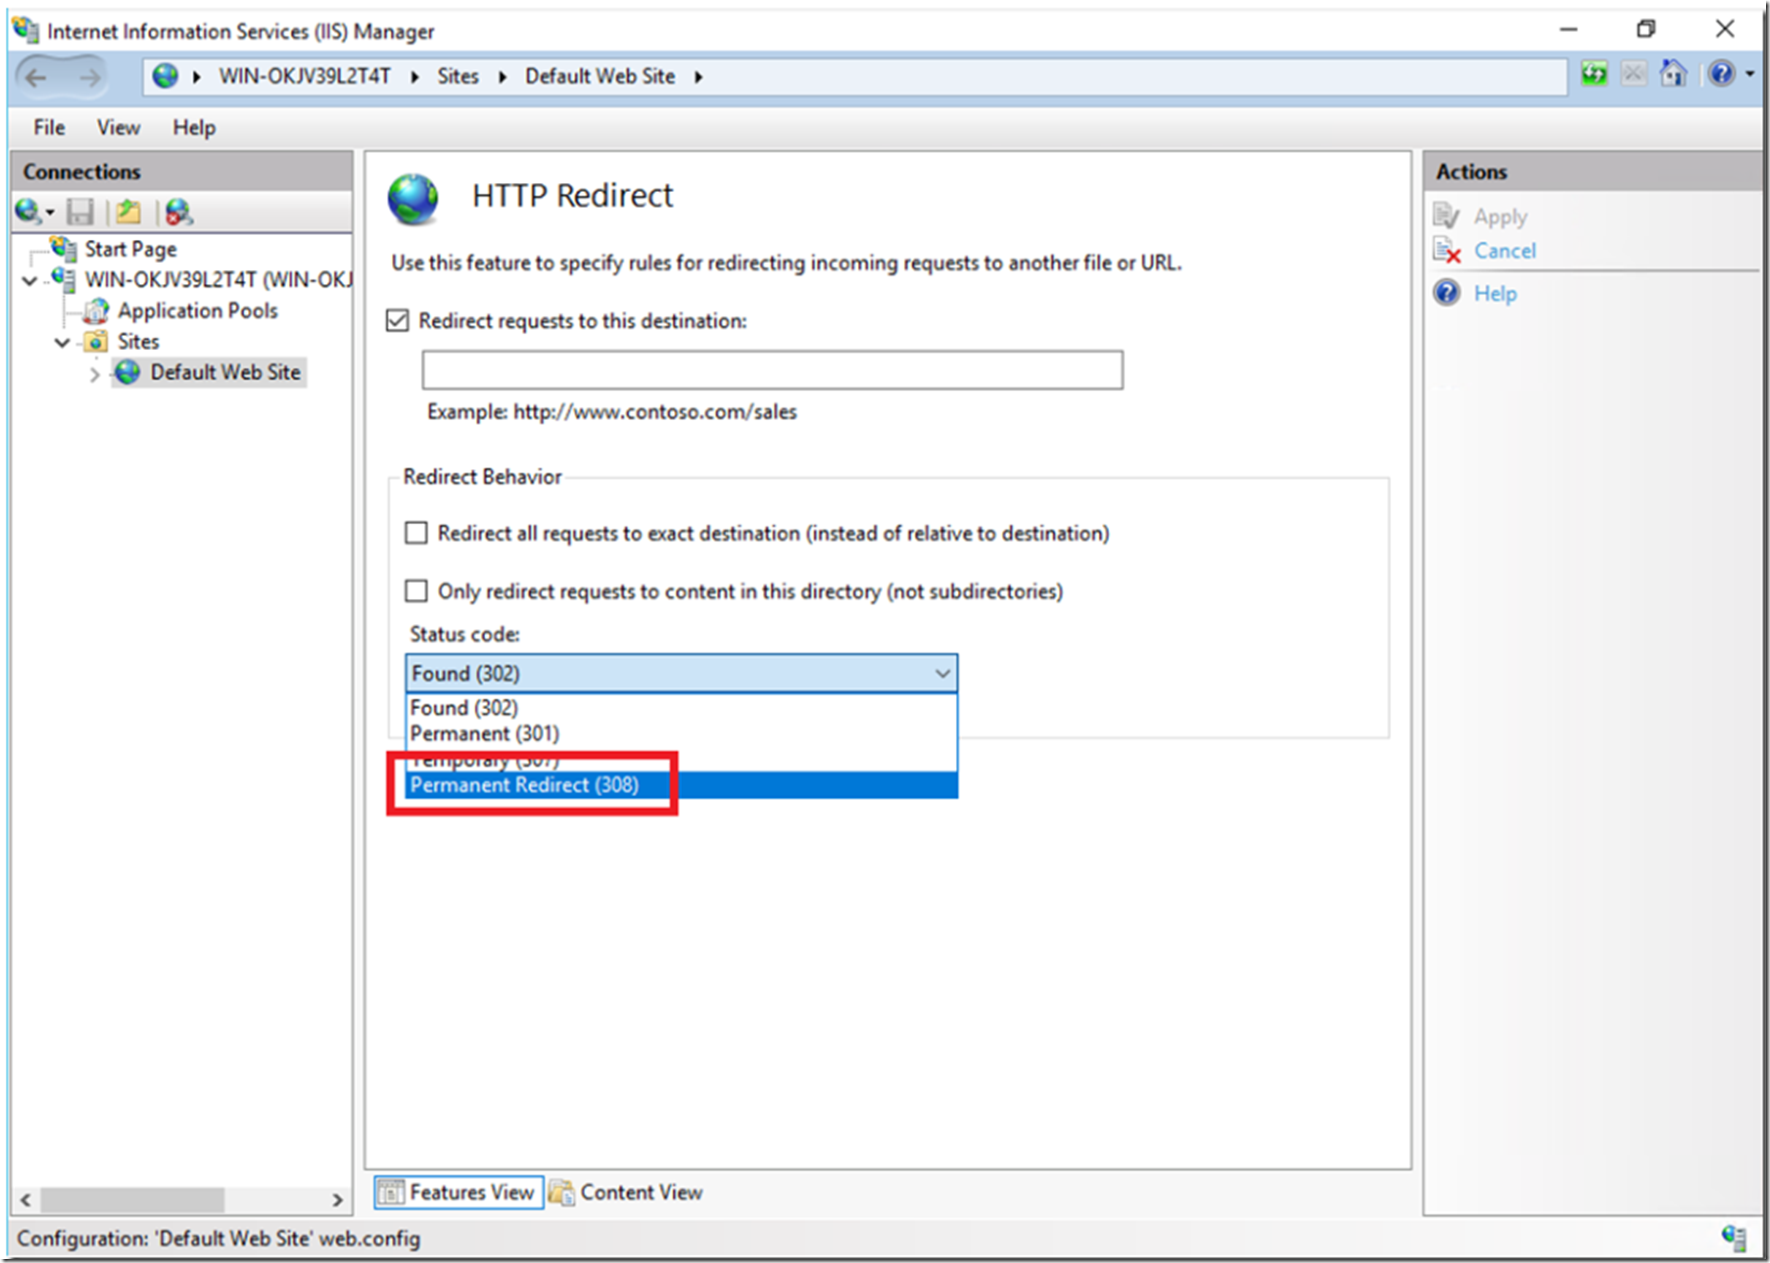
As describe in complete detail here, the HTTP Redirection element redirect client requests to a new location. After installing the HTTP Redirection feature, you will notice the new additional status code of 308 as shown in Figure 6.
Figure 6, http status code 308 in IIS 10
What is the difference between 301 (Moved Permanently) and the new 308 (Permanent Redirect), you might ask?
301 (Moved Permanently) (RFC 2068, 2616) has a lot to do with allowed verbs and some known issues with certain verbs, like redirecting a POST. The requested resource has been assigned a new permanent URI and any future references to this resource SHOULD use one of the returned URIs.
308 (Permanent Redirect) (RFC 7538), The 308 (Permanent Redirect) status code indicates that the target resource has been assigned a new permanent URI and any future references to this resource ought to use one of the enclosed URIs.
Server header removal
When I first wrote this article I tested this and it did indeed work. Recently notified that it doesn’t always work, I am trying to find out what the status is on this one. Until then, you can use the URL Rewrite rule if urgently needed.
I wrote this article here that explains how to remove the server header using a URL Rewrite rule. This is done mostly for security reasons that anyone searching for a way to impact your web site will not know from the start the OS and web server version running the web site. The more information your can prevent from being available the harder it gets to exploit anything.
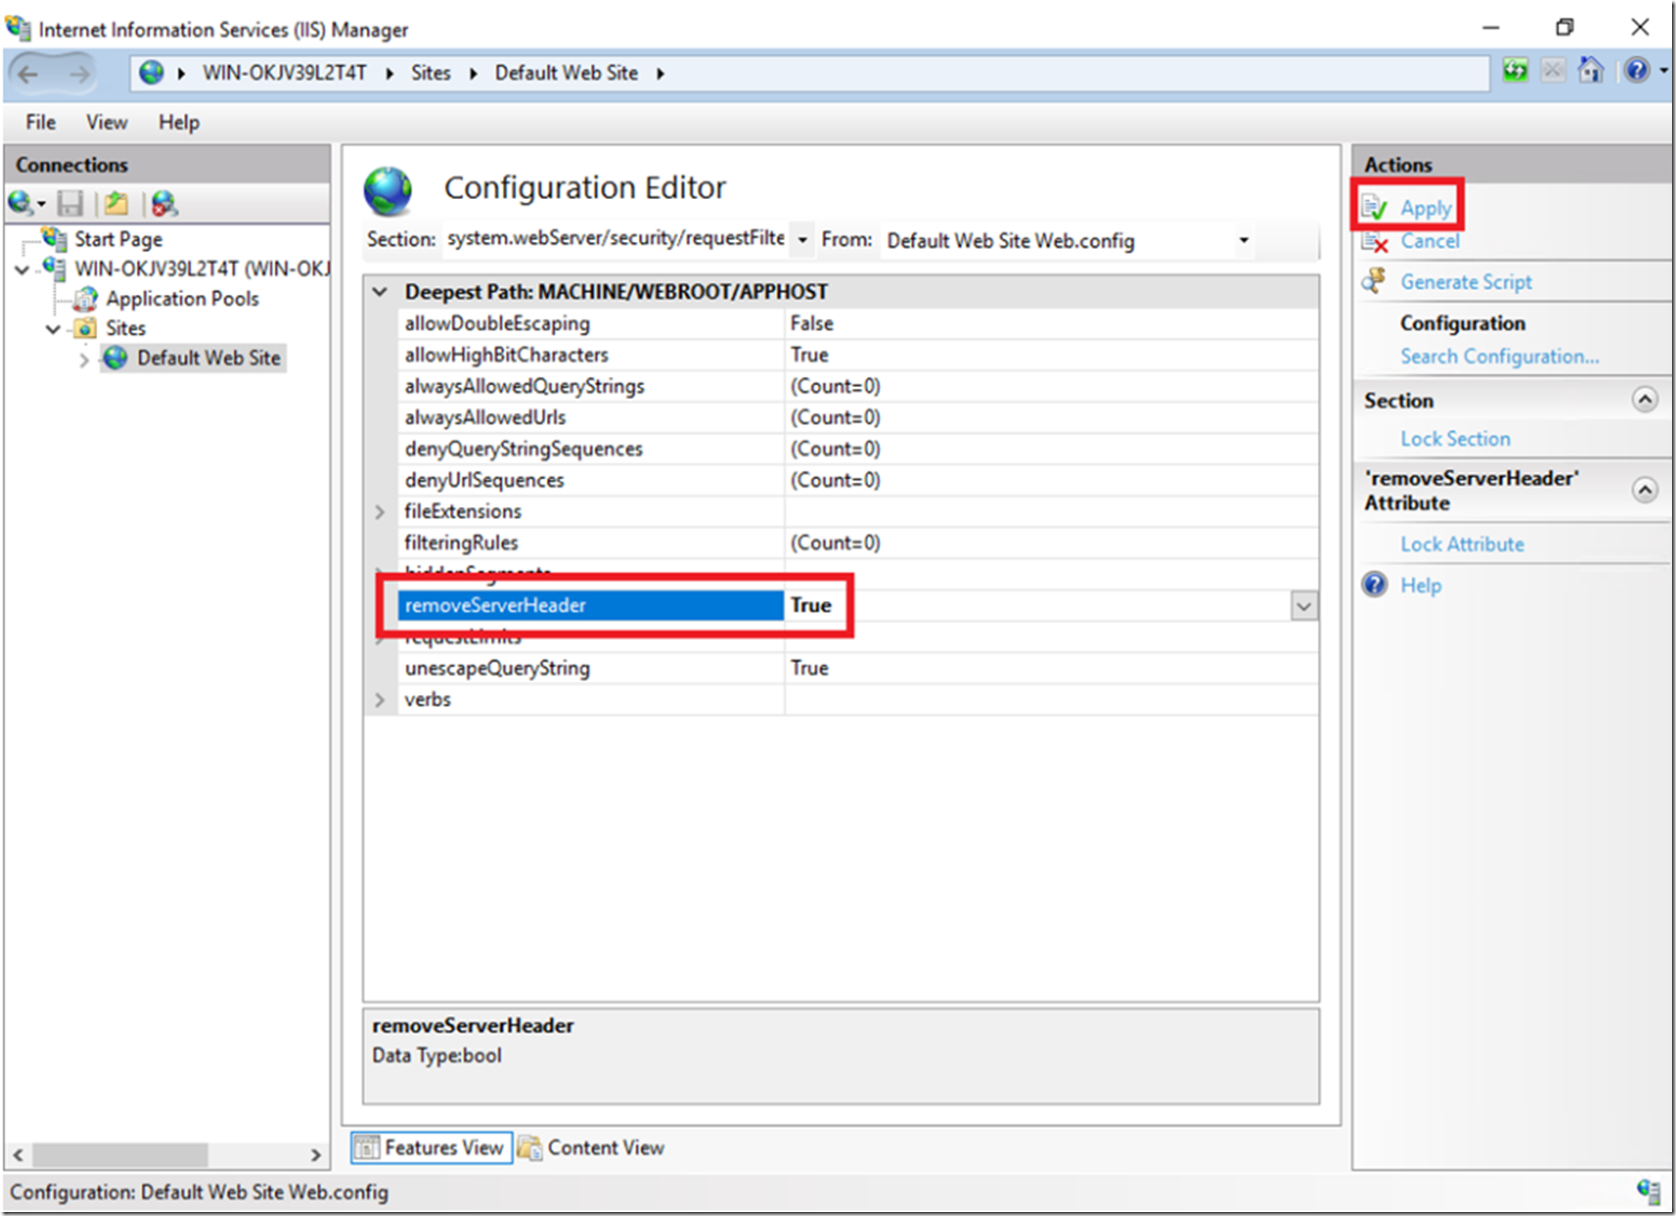
I like the Configuration Manager and you can use it to remove the server header, as shown in Figure 7.
Figure 7, remove server header in IIS 10
The server header can be removed at the web site or server level, using PowerShell:
Set-WebConfigurationProperty -pspath 'MACHINE/WEBROOT/APPHOST/Default Web Site' -filter "system.webServer/security/requestFiltering" -name "removeServerHeader" -value "True" Set-WebConfigurationProperty -pspath 'MACHINE/WEBROOT/APPHOST' -filter "system.webServer/security/requestFiltering" -name "removeServerHeader" -value "True"
The first being for the Default Web Site and the second will remove it from all web sites running on the server.
Failed request tracing – traceAllAfterTimeout
As I mention in Lab 4 here (Figure 13 & 14), of my IIS troubleshooting labs here the Failed Request Trace was triggered at just over 10 seconds. The ‘issues’ is that the FREB log is written as soon as the threshold is hit and then stops. So you can see where the threshold was hit but not what happens after it.
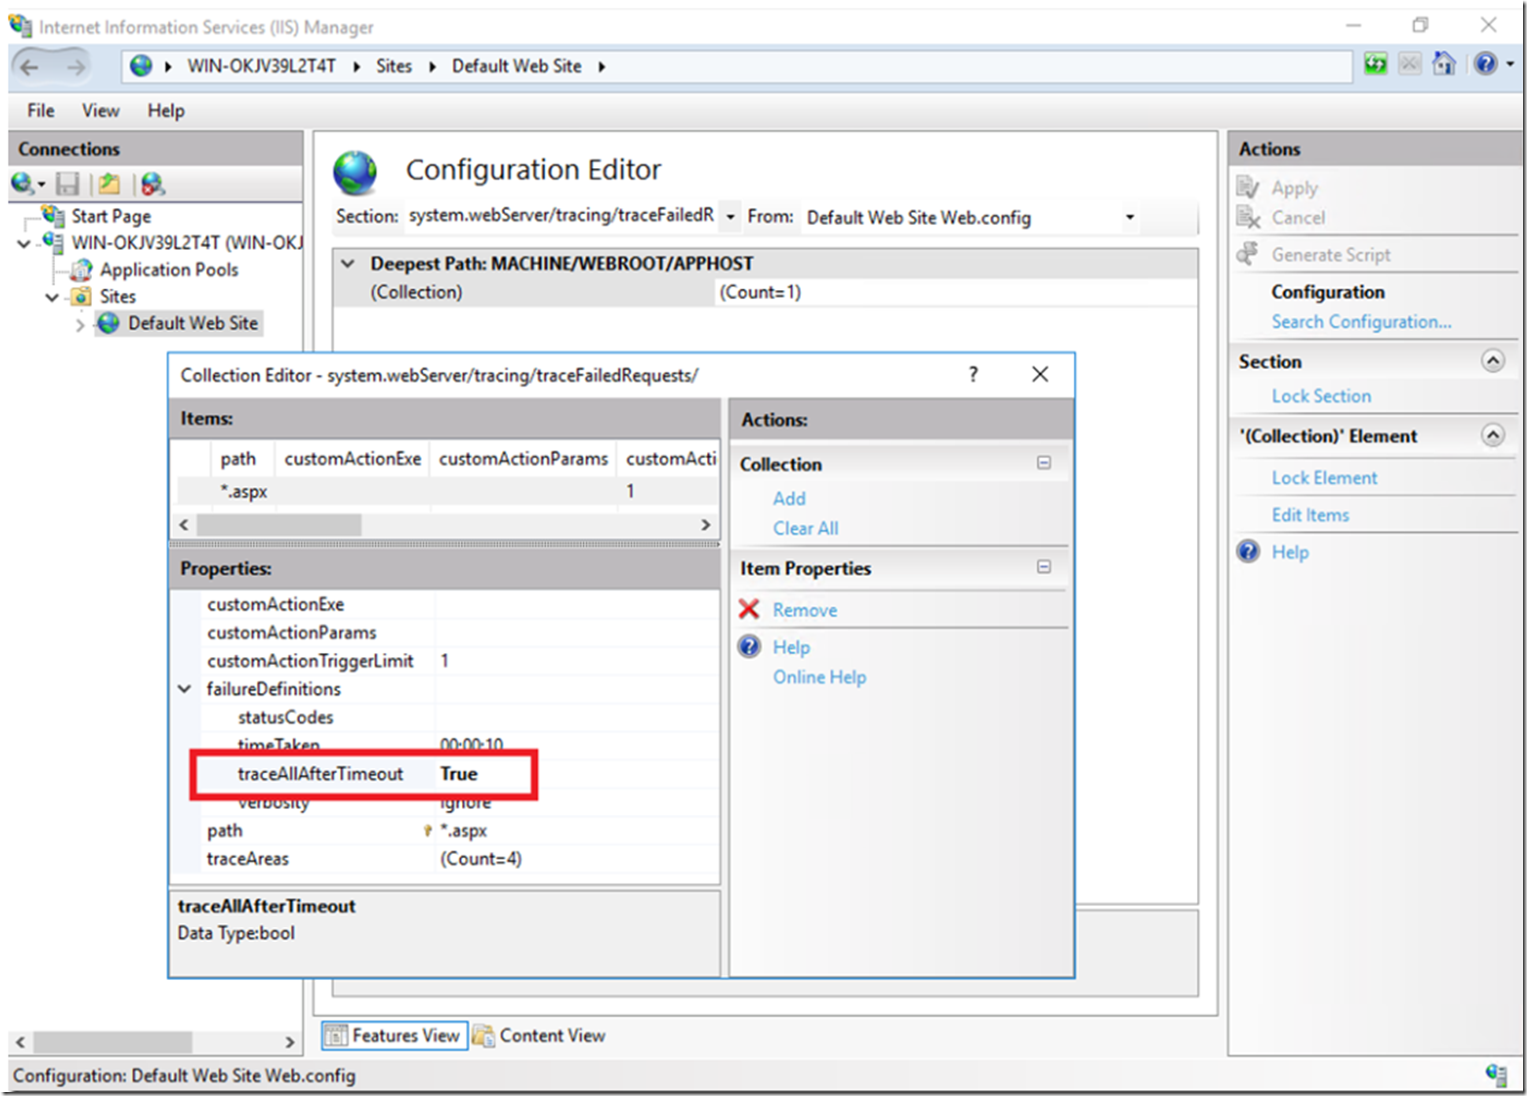
You can use Configuration Manager to enable this as shown in Figure 8.
Figure 8, enable traceAllAfterTimeout in IIS 10
Or you can do the same using either appcmd or PowerShell:
appcmd configure trace "Default Web Site/" /enable /path:*.aspx /timeTaken:00:10:00

appcmd.exe set config "Default Web Site" -section:system.webServer/tracing/traceFailedRequests /[path='*.aspx'].failureDefinitions.traceAllAfterTimeout:"True
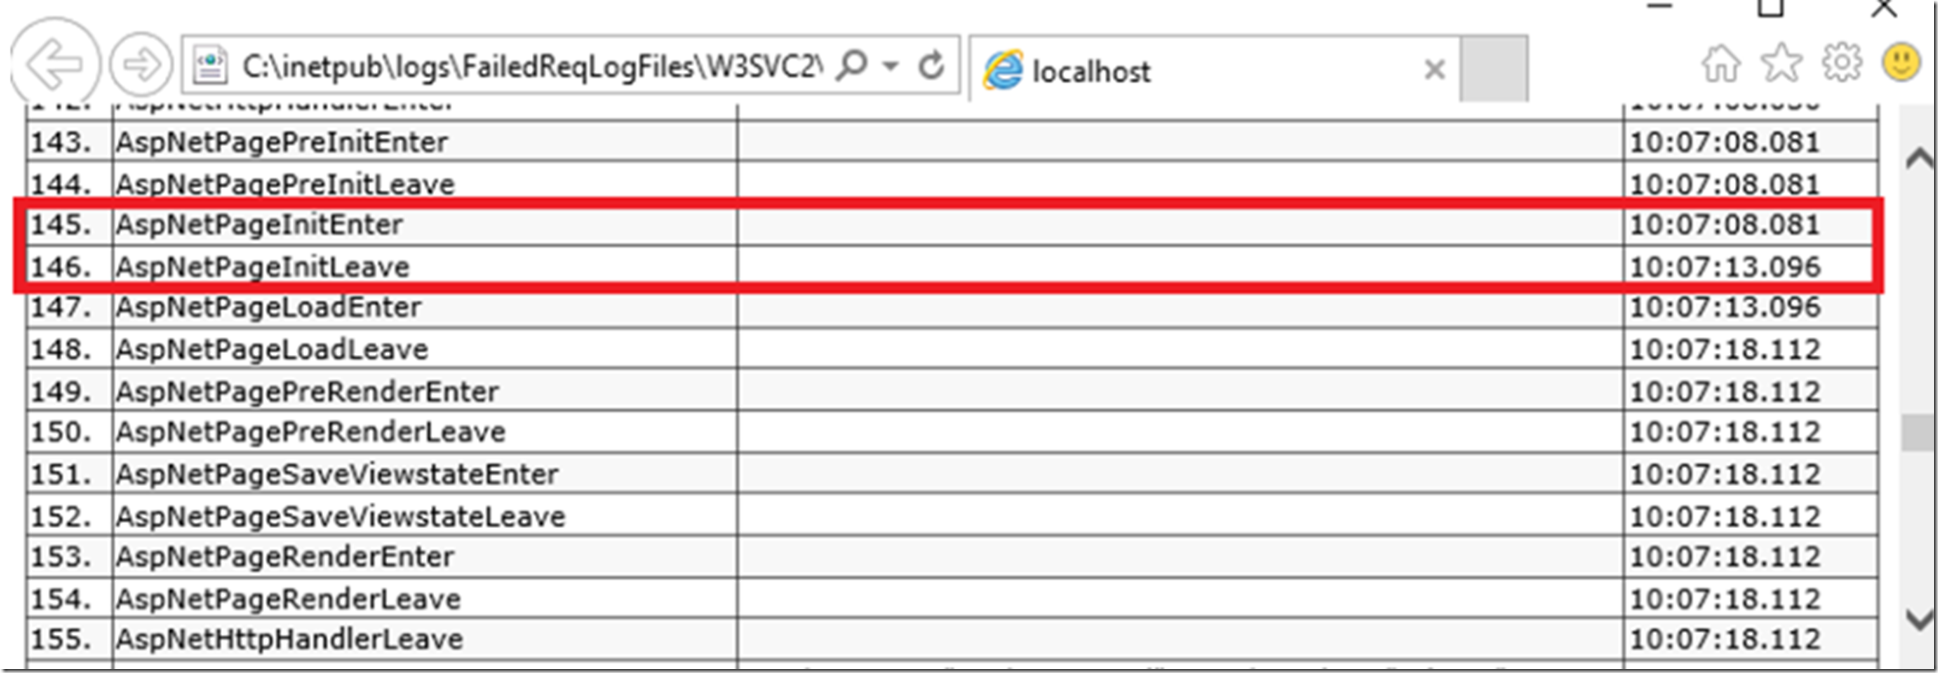
Once enabled you can see and will get the entire trace instead of just up to the point where the timeTaken threshold was hit. See Figure 9 and compare it to what you see in Figure 14 in Lab 4, here. Notice that the tracing continues after the timeTaken threshold has been hit instead of stopping.
Figure 9, enable traceAllAfterTimeout in IIS 10
Log event on recycle defaults
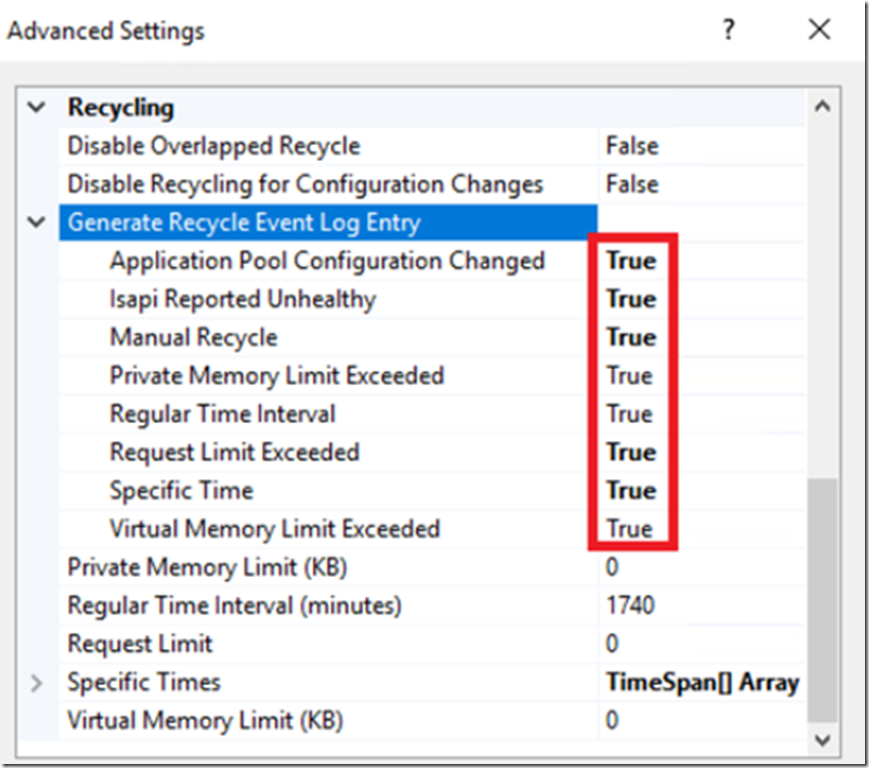
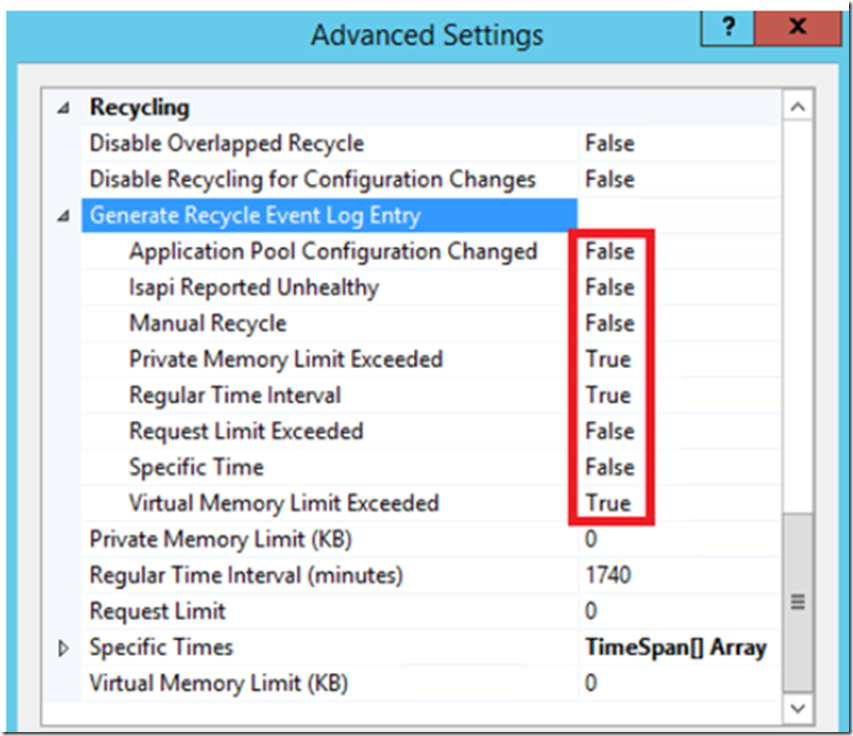
As described here, the logEventOnRecycle changed the default for specifying when to log an event. Pre IIS 10, an event would be logged if a recycle was triggered by a Time, Memory or PrivateMemory configuration. In IIS 10, an event is logged by default based on Time, Requests, Schedule, Memory, IsapiUnhealthy, OnDemand, ConfigChange and PrivateMemory. See that in IIS 10 (Figure 10) the default values are True.
Figure 10, IIS 10 log event on recycle defaults
Figure 11, IIS 8.5 log event on recycle defaults
What this means is that in IIS 8.5, when you setup a recycle based on a Request Limit, it would not have been logged by default, you would need to do the extra configuration to enable that logging. Now, in IIS 10, if that threshold is hit and a recycle happens, then it would be logged in the event viewer by default without the extra enable step.
New IIS administration PowerShell cmdlets
I wrote a IIS Lab 8 here that discusses the WebAdministration cmdlets. The WebAdministration cmdlets are still available on IIS 10, however the new set of IISAdministration cmdlets are more streamlined. For example, instead of executing these WebAdministration cmdlets and commands to view the application pools:
cd IIS:

cd apppools

dir
You can simply execute this one IISAdministration cmdlet:
Get-IISAppPool
Execute this PowerShell to get a list of all cmdlets within the Microsoft.Web.Administration.ServerManager object:
Get-command -Module IISAdministration | Select Name
The ability to GET, create (NEW), delete (REMOVE), START and STOP web sites are all not directly accessible which is a bit more streamlined.
IIS on Nano server
Read more here.
IIS on containers
Read more here.
