The labs contained in this article show how to create, configure, code and monitor an Azure Function with a Storage Queue. There is a detailed document here “Azure Queue storage bindings for Azure Functions” which discusses the Storage Queue trigger in detail so I will not readdress that content.
I have written an AzureFunctionConsumer program which I host on GitHub here. You can use this code to consume the Azure Functions discussed in this series of articles.
Create a Storage Queue
NOTE – to complete this lab you will need an Storage Account.
By default, a storage account is created when the Azure Function is created, as seen in Figure 1.
Figure 1, how to create an Azure Function with an Queue trigger
If you would like to store the queues into a different account, use this set of instruction to create an Azure Storage Account. For this lab, you do not need to create the storage queue as the code in the AzureFunctionConsumer will do this for you later.
Create a Queue triggered Azure Function
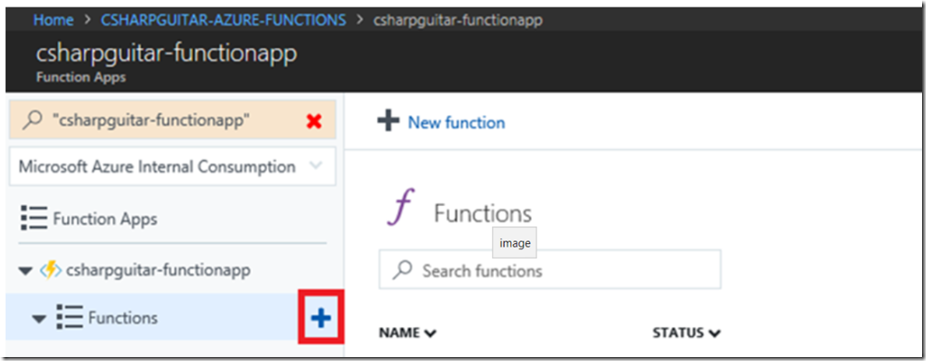
Add a new Function to the Function App by pressing the + sign next the the Functions menu item, as seen in Figure 2.
Figure 2, how to create an Azure Function with an Queue trigger
Then find and select the Queue trigger template, as seen in Figure 3.
Figure 3, how to create an Azure Function with an Queue trigger
Install the Microsoft.Azure.WebJobs.Extension.Storage extension, if prompted. Once installed, check that the following extension has been added to your extensions.csproj file.
<ItemGroup>

     <PackageReference Include="Microsoft.Azure.WebJobs.Extensions.Storage" Version="3.0.0" />

</ItemGroup>
Once complete, continue to the next step.
TIP: If you ever need to install an extension manually, add the extension to the extensions.csproj file and run the following command in KUDU/SCM.
dotnet build extensions.csproj -o bin --no-incremental --packages D:\home\.nuget
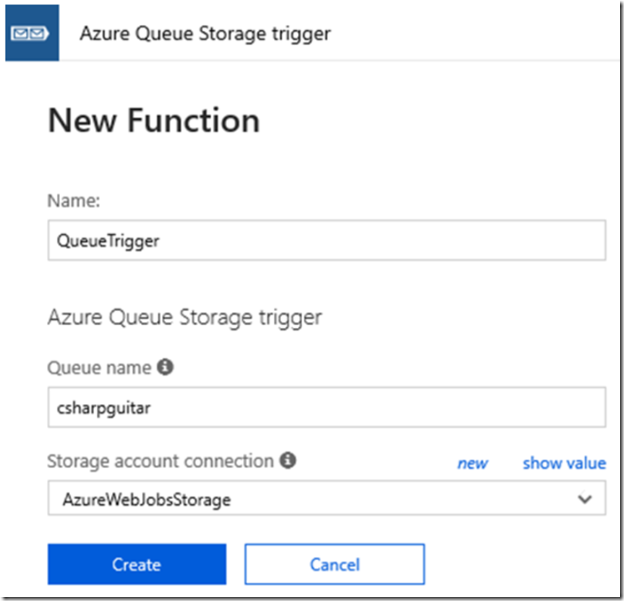
Next, give the New Function a Name, add the Queue name (to be created later), leave Storage account connection ‘as-is’. The storage account connection is, as titled, the Application Setting Name that contains the connection string for the storage account or will contain the storage queue added in the Queue name. See Figure 4. If you want this to be stored in a different container click on new and configure it. Otherwise, press the Create button.
Figure 4, how to create an Azure Function with an Queue trigger
Here is the default Run() method.
using System;


public static void Run(string myQueueItem, ILogger log)

{

     log.LogInformation($"C# Queue trigger function processed: {myQueueItem}");

}
As mentioned in this article here “Azure Queue storage bindings for Azure Functions” the metadata properties available to the Azure Function are those present in the Microsoft.WindowsAzure.Storage.Queue class described here.
Lab 11
Using those properties metadata, update the function code to resemble the following.
#r "Microsoft.WindowsAzure.Storage"


using System;

using Microsoft.WindowsAzure.Storage.Queue;


public static void Run(CloudQueueMessage myQueueItem, ILogger log)

{

     log.LogInformation($"AsString: {myQueueItem.AsString}");

     log.LogInformation($"DequeueCount: {myQueueItem.DequeueCount}");

     log.LogInformation($"ExpirationTime: {myQueueItem.ExpirationTime}");

     log.LogInformation($"Queue message Id: {myQueueItem.Id}");

     log.LogInformation($"InsertionTime: {myQueueItem.InsertionTime}");

     log.LogInformation($"CurrentTime: {DateTime.Now}");

     log.LogInformation($"MaxMessageSize: {CloudQueueMessage.MaxMessageSize}");

     log.LogInformation($"MaxNumberOfMessagesToPeek: {CloudQueueMessage.MaxNumberOfMessagesToPeek}");

     log.LogInformation($"MaxVisibilityTimeout: {CloudQueueMessage.MaxVisibilityTimeout}");

     log.LogInformation($"NextVisibleTime: {myQueueItem.NextVisibleTime}");

     log.LogInformation($"PopReceipt: {myQueueItem.PopReceipt}");

}
The items to note here are:
- I included the reference to Microsoft.WindowsAzure.Storage (CloudQueueMessage classes) and the Microsoft.WindowsAzure.Storage.Queue for static access to MaxMessageSize, MaxNumberOfMessagesToPeek and MaxVisibilityTimeout.
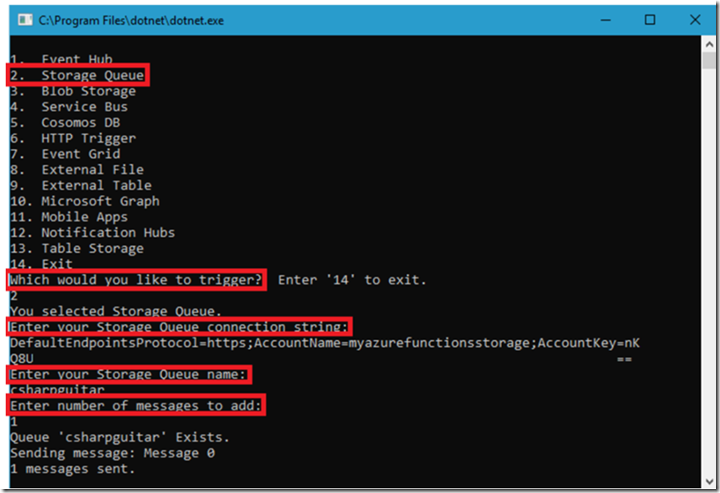
Run the AzureFunctionsConsumer and select the following to upload messages to the queue which will trigger the Azure Function, Figure 5. You will find the value for “Enter your queue Storage connection string:” as the VALUE item for “AzureWebJobsStorage” used when creating the function. Note that the value for “Enter the Storage Queue name:” should equal the Queue name you set previously, see Figure 4.
Figure 5, how to create an Azure Function with an Queue trigger
The output, when triggered, resembles something like the following. You can also view the output via the Monitor blade for the given Function.
[Information] Executing

   'Functions.QueueTrigger' (Reason='New queue message detected on 'csharpguitar'.', Id=...78ed)

2018-10-17T08:01:25.267 [Information] AsString: Message 0

2018-10-17T08:01:25.267 [Information] DequeueCount: 1

2018-10-17T08:01:25.267 [Information] ExpirationTime: 10/24/2018 8:01:24 AM +00:00

2018-10-17T08:01:25.267 [Information] Queue message Id: 61d4e9a5-dfce-4ab2-b3fe-dff24588af54

2018-10-17T08:01:25.267 [Information] InsertionTime: 10/17/2018 8:01:24 AM +00:00

2018-10-17T08:01:25.267 [Information] CurrentTime: 10/17/2018 8:01:25 AM

2018-10-17T08:01:25.267 [Information] MaxMessageSize: 65536

2018-10-17T08:01:25.268 [Information] MaxNumberOfMessagesToPeek: 32

2018-10-17T08:01:25.268 [Information] MaxVisibilityTimeout: 7.00:00:00

2018-10-17T08:01:25.268 [Information] NextVisibleTime: 10/17/2018 8:11:25 AM +00:00

2018-10-17T08:01:25.268 [Information] PopReceipt: AgAAAAMAAAAAAAAAmR1u//Bl1AE=

2018-10-17T08:01:25.269 [Information] Executed 'Functions.QueueTrigger' (Succeeded, Id=...78ed)
The Monitor blade for the given Function, as seen in Figure 6.
Figure 6, how to create an Azure Function with an Queue trigger
NOTES:
Both queues and blobs can be stored in the same Azure Storage Account. Within the account you can create a blob container, a queue, a file share and a table, for example.
From a blob perspective, the function is notified when one is added and the location and how to access is sent to the function allowing processing. Unlike the Queue, where the message is deleted after processing, the blob is not deleted when the Azure Function is triggered.
The default contents of the function.json file.
{

   "bindings": [

    {

      "name": "myQueueItem",

      "type": "queueTrigger",

      "direction": "in",

      "queueName": "csharpguitar",

      "connection": "AzureWebJobsStorage"

    }

   ],

   "disabled": false

}
Congratulations, you have now configured, created and consumed an inbound request to an Azure Function.


